Did you know that car washing and finishing, if done improperly, can do more damage than good? People often go with the “the more, the better” when they apply wax and paint sealants, but the truth is – that is not exactly the best path to take. However helpful, waxes and paint sealants can be the source of future swirls and scratches or in some cases – paint damage.
So, if you want to make the best out all those protective layers, let’s talk about removing the excess wax that accumulated over the months. Applying all these chemicals properly is a skill that takes time to develop. But I’d like to encourage you to speed that process up by informing yourself on this topic right now. Let’s dive right into the bee’s wax!
Why Is It Important to Remove Car Wax?
 The role car wax plays is simple – you apply it as a final layer of protection once you are done with washing and polishing. Thanks to the physical and chemical features it brings, wax protects the car from all sorts of effects, from bad weather and UV radiation to sand and dust particles. All in all, once would assume that it has no downsides. But the truth is slightly different in this case.
While it has many useful sides, car wax can also be a nuisance if used excessively or if not removed properly. Here’s why.
Over time, once it starts losing its main features, wax creates rough surfaces on the top coat of paint, aka surface level. Now, rough and unpolished surfaces represent a magnet for all sorts of particles. Dust, sand, dirt in general, anything can get stuck on the surface level of your car. Once on there, these particles create scratches and swirls of all sizes.
But that is not the only trouble old wax can cause. The uneven surfaces caused by wax also prevent cleaning chemicals from doing their work. Shampoos and paint sealants lose their power when fighting old wax in excessive amounts.
When Should You Remove the Current Wax Coating?
There is more to all this than just removing the old coat of fax from your car’s surface. You should be prepared to apply a new coat right away, thus maximizing the protective features of a fresh new wax coat. However, deciding on the right time to go through it all is not as easy.
For example, removing swirl marks is done two times a year (or sometimes three) at max. This process shaves off a layer of paint, and it shouldn’t be done often. But, being that waxing adds a layer without taking anything off, it can be done more often.
The timing for car wax replacement depends on several factors:
- The weather in your area – more rainfall means that you need to wax the car more often
- Extreme heat or extreme cold affect the wax layer as well
- The type of wax you use and its recommended replacement period
- The amount of time you spend driving daily (on average).
If you are new to all this, I’d recommend removing old wax (and applying a new layer) once every 3 months, or 4 times annually. Two of those four times should also match the timing of swirl removal.
How to Remove Car Wax Residue from Different Car Parts?
 Once you know the details behind the downsides of old wax layers, let’s talk about the practical stuff – removing excess wax from your car’s surface.
To make things easier, I divided the car’s surface into three parts, because of the different approaches we take to clean them all.
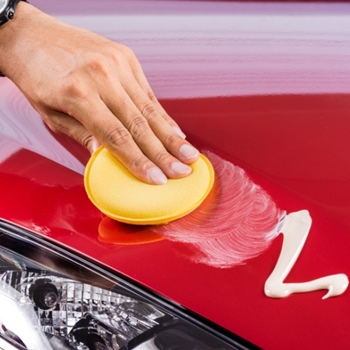
1. Removing car wax from the car’s coat of paint
First of all, I recommend you to familiarize yourself with a clay bar. It is a soap-like bar that removes all sorts of substances (wax included) from painted surfaces without damaging them in any way. Also, for this task, you will need some clean rags or cloths (microfiber preferably), and a new batch of wax at the end. If you assess that the situation is really bad in terms of old wax amounts, you can also utilize the help of some wax-removing agents.
Firstly, you need to wash your car, making sure that only the old wax remains after the car dries out. Using hot water will help with some bigger wax deposits that accumulated over time, but don’t be disappointed if you don’t manage to remove a lot of wax initially. After all, car wax is there to protect your car from water and other elements. It’s only logical it is hard to tackle it while washing the car.
Once your car is clean and dry, inspect the paint and mark the critical spots somehow. Now, use the clay bar in front-to-back motion and start removing the car wax residue. Some elbow greasy is required for this part.
A few tips on using the clay bar
No matter how experienced you are with this cleaning method, it’s always good to know how clay bars work.
- If you drop your clay bar on the ground, you shouldn’t continue using it. Once the clay bar gets dirty, by using it you only risk making swirls and scratches while removing the old wax coat.
- Clay bars can heat up due to all the motion. If this happens, you need to wait until the bar cools off for a bit. Clay bars get less potent when they heat up.
- Always use some sort of lubricant while removing car wax residue with a clay bar. Dry scrubbing can only damage the paint, while also making the clay bar heat up faster.
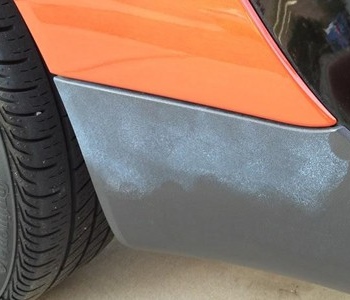
2. Removing car wax from plastic trim
If a lot of wax residue accumulates over time, plastic trim on your car can look old, sun-beaten, or even broken at times. Don’t worry, this is fixable and completely reversible (unless the plastic trim is actually broken). Because waxing is not a precise process, we often wax the plastic parts as well. While this does not affect the plastic directly, over time it can become a nuisance.
Of course, the first thing you should do is wash your car, paying special attention to the plastic trim. Using hot water may help.
Now that the plastic trim has dried out, you can tackle the car wax stains on it. One successful method is to use a pencil eraser. Yes, you heard that right. The plastic trim on your car is porous. This material feature allows a lot of wax to accumulate in those pores, but it also allows the rubber to remove it. If you do decide to use the pencil eraser, make sure to use it only on the plastic. Rubbing the paint can damage it permanently, or leave deep marks you’d have to get rid of separately.
In the case of huge wax buildup, use some sort of chemical that tackles waxes and greasy substances. Vinegar can help as well. Let the agent work its way in and continue using the eraser. Wash off the leftovers and wipe everything with a dry microfiber cloth.
3. Removing car wax from headlights
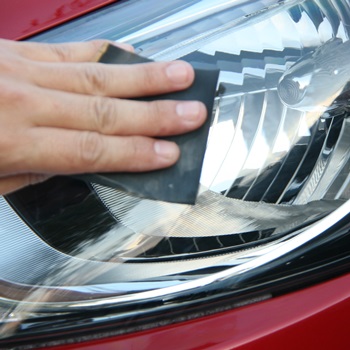 Vehicle headlights need to be clean, not only for aesthetic reasons but for utility reasons as well. Wax buildup can significantly reduce the effectiveness of headlights, making night car rides dangerous due to lower visibility.
The truth is you can combine the methods to clean the headlights. Rubber will work, as well as agents designed to tackle wax. I’d recommend going with a headlight restoration kit to seal the deal. While smaller than the other waxed surfaces, headlights require special attention.
Whichever method you chose, make sure to test the chemical of choice on a smaller piece of headlight plastic. And of course, wash the car, headlights included, beforehand.
4. How to tell if there is more wax to remove?
There are a few ways of checking whether there’s wax left on the car’s surface. Don’t worry, each method is based on common sense.
- Visual inspection – obviously, you should go around and check all the critical spots you tackled. Wax will provide a special shine and the light will reflect against it.
- Inspection by ear – yes, you read that right. Take a dry microfiber towel and rub it against the surface of your car. Surfaces with no wax applied will give off a familiar squeaking sound.
- The water test – You can also pour water on your car and look for spots that are holding large water droplets. If there are any, there’s also wax residue underneath them. The water stick to the wax thanks to its hydrophobic features.
Additional Tips and Tricks
1. Can I use vinegar to remove car wax residue?
 You can, but I would not advise it. Vinegar can do many things, and it is quite potent in removing water stains. But its acidic nature can be damaging to the car’s coat of paint. Vinegar will tackle wax as well. But if you do decide to use it, you must be aware of the fact that you risk paint damage too.
If you don’t have alternatives at hand, vinegar can be a go-to solution. Again, test a small amount before going all in.
2. Removing wax with dish soap
Dish soap, especially the degreasing kind, can be your ally in fighting wax residue. However, soaps require a lot of water to work completely, and water is not exactly the best choice in removing car wax residue.
Dish soap will be able to help you, sure, but it is also notorious for leaving watermarks all over the car. I would recommend this method if you are out of alternatives, or you are experienced enough with the soap to know what you are doing.
3. Pressure washing (with heat)
Lastly, when chemicals fail, you can turn to a pressure washer for cars. These powerful machines utilize pressurized water to combat dirt and grime of any kind. Pressure washers that support hot-water washing can even make some wax melt away.
His method, however, comes with a huge downside. Pressurized water brings along a high risk of paint damage. After all, these machines are no toys. I would recommend using a pressure washer on less sensitive surfaces, like wheels, first.
Wrap Up
Who would have thought that car wax residue can cause all that trouble? In my opinion, the best way to fight excessive amounts of wax is by learning how to use it in the first place. Prevention is always the best path to take. Removing car wax residue is not something we do often, but when the time comes it is vital to do it right. Every wax deposit you leave on the car’s surface is a potential scratch mark in the future.
I am aware that this can be a lot to take in at once, but I do promise you that it is easier done than said. All it takes is a little patience and some good old elbow grease. Now go and give your car paint an inspection, who knows what you may find!