Keeping your car maintained is no easy task. From engine maintenance to keeping your windshield nice and clean, the list of things you have to take care of just grows longer. However, an aspect of vehicle conditioning everyone forgets is – cleaning. Washing your car doesn’t only give it a nice and shiny look, and keeping it swirl and scratch-free provides more than just esthetics.
In the following sections, I would like to talk to you about swirls and scratches, how they occur, how to get rid of them (manually and mechanically), and lastly – the ups and downs of the whole process. I’m sure that many of you that find this article know the frustration of having to polish a freshly washed car because of swirls, but hey – it is all for the good of the car. Let’s dig in!
Swirl Marks and Scratches – the Common Causes
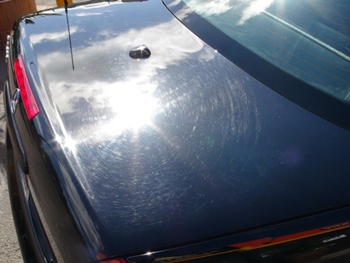
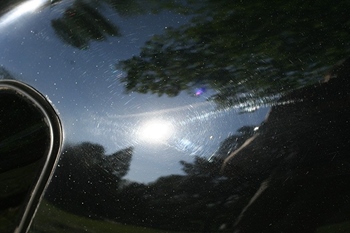 People usually notice swirls when they multiply so much that the coat of paint you used to know doesn’t look the same anymore. But what causes those infamous swirl marks and scratches? They are not big enough to be considered real damage, and not small enough to be, well, ignored.
Swirl marks and microscopic scratches of all shapes and sizes (but not depth) have a tricky origin. Believe it or not, the most common cause of swirl marks is – yourself! Weird, right?
Well, since swirls are microscopic round marks on the surface layer of your car’s coat of paint, we tend to oversee how easy it is to make them. Dirty washcloths, rags, and old sponge pads are the main source of swirls.
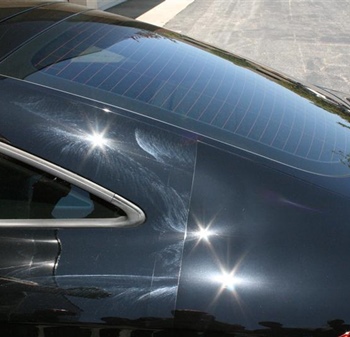
Unclean washing equipment can also leave scratch marks if you wipe in a linear fashion, but the main cause of linear scratches are automated car wash stations. Don’t get me wrong, an automated car wash will surely remove mud, dust, and all the nasty stuff, but it also leaves a mark. Those large brushes are hard and their main role is to get rid of the filth your car picks up on the road.
The reason why unclean washing equipment makes swirls easily is simple – micro-sized dust particles that hide inside the washcloth materials tend to damage the finest coat of paint on the surface of your car. This damage is not integral in any way, but it does change how light reflects against the car’s surface, making it look more matte than shiny.
So, to avoid coating your car in swirls and scratch marks, you should also avoid automated car washes. I’m not saying it will do any damage to your car, but it will certainly kill the glossy paint job until you polish it.
A list of the most common causes of swirl and scratch marks
Besides having a dirty washcloth, these factors may affect whether or not your car’s paint coat gets a mark or not:
- Wiping the surface of the car with an old and dried up cloth
- Going in too harsh with the car buffer or a polisher
- Using unsuitable chemicals for polishing and buffing
- Not rinsing the washcloth often enough while you wash the car
- Covering your car with a dirty car cover
- Sponges, cloths, and applicators that contain a lot of polyester
- Driving in the rain often, especially in areas with a lot of dust and sand
Removing Swirl Marks – How Does It Work?
 Removing micro-tears and swirls from a paint of coat requires a few ingredients and some decent cleaning gear, but above all, it requires the free, most expensive thing there is – patience. And by patience, I’m not only referring to carefully polishing the car’s surface but being patient while washing the car in the first place.
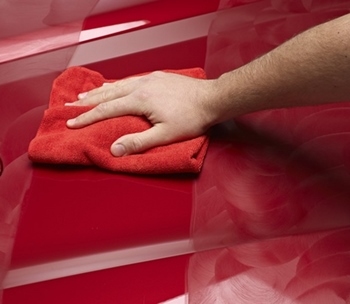
There are two main methods you can use to get rid of those swirl marks – manual and using a car buffer (polisher). No matter which one you opt for, the results should be about the same, though the methods differ to a degree. Of course, polishing the car by hand can be done without a power source, and it is more convenient for smaller spots. On the other hand, using a specialized machine to help you with this task will require way less elbow grease in the long run.
Polishing the swirl marks makes them disappear by removing the top-most layer of paint. This layer is so thin that it is almost non-existent. Remember – swirls and small scratches are just super small dents in the paint, so all you have to do is even out the surface coat of paint.
While you are physically working on the swirl marks, the polishing agent is there to fill in the gaps and prevent new marks from appearing easily. Sounds easy, right? Technically, it is, but you need to be prepared to start really slow, because – you can make new swirls if you don’t polish properly. Don’t worry, though, this is all a matter of experience and you will get a grip on everything faster than you expect.
Will removing swirl marks and scratches damage my car’s paint?
The ever-growing debate among car enthusiasts – is polishing your car bad for the paint job? The short answer is – yes, polishing technically damages the surface layer of your car. But, as all car things go, there is a caveat.
Swirls and scratches make your car’s coat of paint susceptible to deeper marks and actual paint damage. So, removing swirls eventually leads to a healthier paint coat, despite the fact that you are skimming off a microscopic layer of paint. Modern technology enabled us to control how much of the paint coat we can skim. The thing is, cars have multiple paint layers on their surface, not just the one you see. This paint is primed and treated both chemically and physically to stick firmly for a long, long time.
This is why you shouldn’t polish your car, especially with a buffer/polisher more often than twice or three times a year. But If you do the job well (and avoid automated car washes) your car’s paint should hold that shine for most of the year.
How to Remove Swirl Marks from Cars (from the roof down to the wheels)
Ok, now it is time to get to the brass tacks. We talked about swirl and scratch marks origin, how to avoid them, and the process of removing them. Let’s talk about the actual act of removing swirls and scratch marks. But first…
1. Preparation is Key!
 Before you even begin with polishing, you need to make sure that your car is properly primed for the whole ordeal. No matter if you plan to do everything by hand or using a machine, you need to do a couple of things first.
- Wash your car from the roof down, even if you don’t plan on polishing today. Make sure to use a two bucket method, or if you prefer, use the pressure washer for cars.
- After the car’s surface dries out, it is time to inspect the pain. Look for rust, oxidation, paint damage, and paint contaminants. You’d be surprised by how much hazardous chemicals cars pick up along the ride.
- If you spot severely damaged areas, try using a fallout remover. This will make the whole process longer, but it will protect your car’s paint better, and most importantly – for longer.
- Make sure you have everything on hand before you start polishing. Clean rags and cloths, favorite polish, extension cables if you plan on using a buffer, etc. Once the process begins you have to go all the way through.
- If you decide to use wax as a finisher, make sure to have it ready by your side. Waxing should be done immediately after you are done removing those nasty scratches.
2. Removing Swirls and Scratches Using a Car Buffer/Polisher
So, you have decided to give a car polisher a go. You got the applicator firmly attached, and the favorite polish agent at your disposal. Here’s how to approach the whole thing:
- Always double-check for paint damages. Also, make sure that the spots you are about to work on are clean and dry. Mark the spots you want to tackle, or simply remember them.
- Take the polish bottle and apply 3 to 6 drops of the chemical onto the applicator pad. Try to spread out the polish evenly so you don’t have to deal with excessive polish quantities later.
- Once the polish is applied, you can turn on the buffer/polisher. Start from the lowest setting, making sure you have a firm grip on the machine.
- Once the polish agent is applied to the car’s surface evenly, you can start increasing the rotation speed of the polisher. Again, make sure to have a firm grip on the machine because it will try to fight you off once it speeds up.
- Surface level swirls and scratches take about 30 to 45 seconds to disappear, but if you spot a deeper swirl, spend an extra 10 or 20 sec on it.
- Turn the machine off, make sure it is secured. Remove the excess polish agent with a CLEAN microfiber cloth. You don’t want new swirls appearing right away.
3. Removing Swirls and Scratches by Hand
If you are a fan of the good old elbow grease, or you simply want to work on smaller spots, you can take the manual route. The basic principals are the same, only this time you get to feel the pressure and focus on the swirls a bit better. Here’s what you should do if you are a beginner:
- Once you checked for paint damages (and the car dried off), you are ready to start. I would like to encourage you to prepare extra clean cloth for manual swirl removal. The thing is, as soon as these cloths start getting dirty, they become capable of making new swirls, which kind of defeats the purpose of the whole ordeal.
- Apply the polish gently – a pea-sized drop is enough for a smaller swirled area. Start with smaller amounts and add when necessary.
- Using circular movements, start with the smallest swirls and scratches. After a few seconds of rubbing, you will notice whether there’s excess polish or not. If you notice the polish agent separating from the paint, wipe it off with a separate microfiber cloth immediately.
- Once you are done with a swirled spot, remove any excess polish, and move on to the next swirl.
Once again, it is really important to remove the excess polish chemicals before the spot fries off. If you just leave it there, you risk paint damage and more swirls.
4. Picking the best Time to Polish Your Car
 There isn’t an ideal moment to polish your car, per se. But people who live in dusty areas, and areas with a lot of rainfall, should have some sort of schedule.
Remember, polishing shaves off a layer of your car’s paint, so it is not advised to do it more than twice, or at most three times a year.
If you are new to this concept and don’t know when to start, I’d encourage you do polish your car once spring ends and just before winter. Summer usually brings a lot of dry days which are ideal for dust spreading. And the winter brings a lot of harsh weather and winds, so it’s better to be prepared.
After all, don’t forget that chemical agents like car sealants and polish have protective features, besides making your car shiny and clean-looking.
Wrap Up
Who would have thought that getting rid of swirls and scratches is this intricate? Don’t worry, even though it seems difficult at first, all it takes is a few times of actually polishing your car, and you will become a master. This, I promise! It took me about 5 times to actually get a grip on car polishing, and, to be honest, it all changed once I started using appropriate machines and chemicals.
There is no shame in admitting that you want your car to look pretty. After all the color finish is there to make a statement in your name. Not a big one, but a statement nonetheless. After all, I always insist on spending more time with your car if you want it to stay in good condition. You get to learn how the car breathes and moves, so fixing smaller things gets tremendously easier over time.